
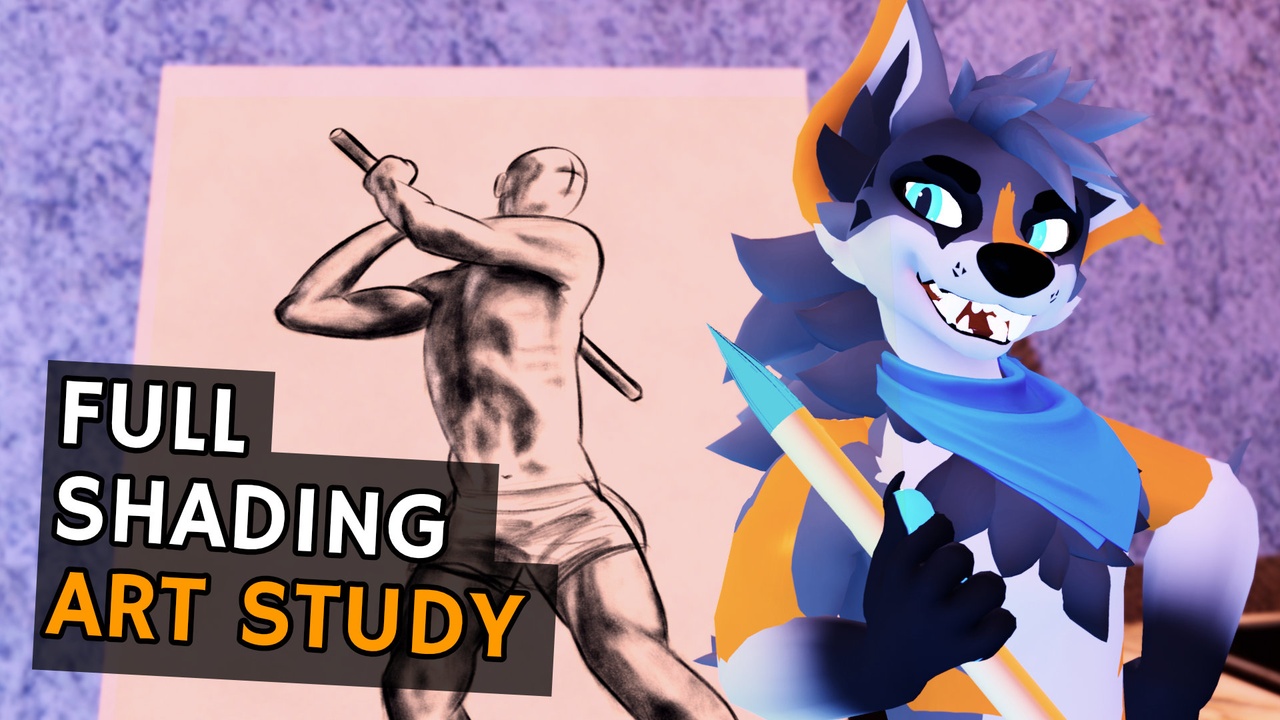
Hello artist or art enthusiast! Today we’re going to do a little paint-along with a shading study. You’re getting the full 40-minute experience today, and I’ve set this up to feel like a cozy hangout while I explain my process. Nothing is sped up, there’s no talking over a timelapse, just us and some art.
For folks who don’t know me, I’m Kanjon, an artist who wants to convince everyone to learn to draw. What I’m going to show you today isn’t expert-level work; it’s definitely got some mistakes in it. Even so, I think it’s useful to walk through and explain my thought process – sometimes finding the smallest nuggets of information from another artist’s methods can help loads in your own. If this inspires you to try something too, by all means, share a recording of your studies! Learning from each other helps us all improve.
I’m going to be shading in this study of this photo from Grafit Studio. (Please note, this is not a sponsorship, and I have paid a little extra to be able to show you this on video; make sure you also have permission to do that if you’re gonna publish something like this.) It’s not an exact study; you’ll see it has a few mistakes as we get into it, but it’s good enough for trying some shading. Let’s get going!
Note from Editor Kanjon: Most of this video is unscripted speaking into a microphone while drawing. This portion is auto-transcribed and may have mistakes.
So, to start, I’m just using a stock Procreate brush. This is Scopus. I like it because the brush shape is kind of uniform. Some of the pencils are a bit longer in one direction, and then you have to like tilt it the right way. But I like this one a lot because it’s got a nice gradient to it. I can put it on its side and get nice shading with it, and I can really work in marks by etching them in. Or you know, if I want to press hard, that works well too. So we’re going to use that brush. I’m just using it on basically like gray color, I guess a little bit of purple or something, but there you go. And we’re going to start shading the sky. So the first thing I want to do is look at that reference. And we’re going to see where the light’s coming from. Now when I’m doing a study, I’m not like consciously doing this all the time because I’ve kind of just gotten into a habit of noticing how the light falls on someone. But here, I want to show you what am I looking at?
So there’s going to be a light source somewhere over here. It’s pretty bright. We look at the character like they’re being lit by some light that’s probably closer towards the camera and from the right. And it’s pretty harsh. But if you look over on the left side, there’s another smaller light coming in. Maybe it’s behind them a little bit. Not quite sure, but it really kind of lights just the edges of some things there. You can see this on the pecs just under that arm. So a little bit on the legs and on the face and the upper arm, there’s a bit of that light coming through. So I’m going to pay attention to that. And additionally, I don’t think there’s actually one of these lights in this particular setup, but there’s a little bit of bounce light coming off of the floor. And that’s illuminating some of the lower parts here. Namely, just the shins down here. Well, maybe do something with that, or at least just kind of acknowledge that it’s there.
without really trying to tell you exactly where I’m going to start, I’m just going to well start. So I’m just going to take this brush, this pencil brush and just start pushing in some color here. And I’m doing this digitally. So I could be using undo, but I’m going to try to avoid doing that because I want to make sure that you have the opportunity to do this on paper. In fact, I would recommend doing this on paper first because it’s just way easier, frankly. This is not my first time doing this recording. I’ve done this a couple of times today, or at least warm ups with it. The sketch too, like so don’t assume that I’ve got a perfect sketch the first try. This was a couple tries to get this one out of here. But I do find the process of shading to be pretty dang relaxing. And I hope you do too. There’s some parts of this that we’re going to have some mysteries about and we’ll figure them out together. But it’s just nice.
I’m just kind of putting some dark marks in here. I’m not even really like finishing what I started up there. I didn’t do everything on the chest. We’re just kind of going down the side because that’s where I went. That’s what I felt like doing. And if I look at the ankles down here, this is where the shadows kind of start to get like flat. Like it’s hard to tell. Does any side get darker than the other? Not really. And start to tell to our eyes that it’s possible that’s just how it is and how it should be. But sometimes you want to look a little deeper. But I think this is just how this one is. You want to make sure your brain is not being tricked and that you’re actually capturing that detail and that difference in value. The value being how dark something is if you’re not super familiar with that term. I’m going to capture this and really just fill this in. I’m not going to worry too much about it looking perfect yet. I’m really not going to worry about it looking perfect by the end of this either. Like there’s got to be mistakes here. In fact, I’m pretty sure this drawing as a whole is not perfectly matched up with the original reference. And Editor Kanjon will probably edit in a thing here and show you that it isn’t.
Eh, yeah, little different, but close.
But that doesn’t really matter. We’re shading. We’re doing a shading study and we’re following along with the rest of it. Because if it’s close enough, then that’s enough to really get things going with the shading side of things to really get in those skills of studying values. And so that’s progressed in there. Let’s go ahead and move on to the other leg.
Now there’s something I’m kind of avoiding here and that’s this underwear. I mean, there’s underwear in the photo, right? It’s right there. And clothing is just hard as heck. So I’m avoiding doing it. I’m just not doing it. We’ll leave that there. And we’ll put in a couple marks of folds, but clothing is a hard topic. So we’re not going to try to shade it correctly. I’m just going to like scribble, scribble, scribble, sort of put in some things like sort of how clothing folds work. Now, if I sat here and actually studied that, I could probably make that look a little better, but we’ll leave that for now. That’s all I want to do. We’re just covering that up. Maybe we’ll do something later. I don’t know. Maybe not. Because this is just a study.
And I’m not really going to use this for anything other than, well, the obvious point of this being on a YouTube video that a bunch of people are going to watch. Oh gosh, frightening. But that’s why I practiced this one a little bit before. And so hopefully Editor Kanjon put in some extra effort here to make sure some of those pencil noises are coming through too. And maybe put on some chill out music because that’d be nice. Well, I tried, but turns out the mic was picking up neither that nor my voice correctly, but you get the chill out music at least. That music would be coming from Chillhop because, well, they let their creators use that selection of stuff for free. I like that a lot. I pay another music licensing service for my main videos just because I can really search for particular moods and all that stuff. But Chillhop’s really nice. Check them out.
You’ll notice also I didn’t really detail any of the feet or hands. That’s just not what we’re studying. We’re just studying shading values, that sort of thing. The things that I’m looking out for here are where things get dark near muscles. So there’s, you know, I’m going to just frankly say I’m kind of terrible at anatomy, so there’s something here. I forget what that’s called. And I’m not trying to draw the outline of it because that’s not my forte. I don’t I don’t do that, You don’t do that yet! What are we gonna do with you, Unscripted Kanjon?
but I can notice that there’s a shadow there. Whoops. See, I already used undo when I said I wasn’t going to do that, but that’s because I was drawing on the picture to show you something. So no more undo from here, right? Though so I’m going down through this and I’m paying attention to the fact that like on the light side, it doesn’t really fall off. There’s not really a part of it where there’s a little bit of shadow there. It’s just it’s not there. It’s just bright. Now there’s little bits of shadow scattered throughout here that we’ll get to, but once again, I’m undoing to cover that up. Whoops. But anyway, we’ll get to that. Now, there’s a couple of things in here that aren’t actually on the reference. And these are sort of like my gesture marks, like a line of action, I suppose. And just to make sure I don’t actually make a mistake with this, because I actually did one of my practices, I’m going to just etch that out a little bit, because this is actually one shape coming over here with the arms. But my line kind of comes up in there because I wanted to have this sort of shape flow up into the shoulder, come back around, because it really gives it that feel that it’s full of motion. Now, one other interesting thing I’ve had about this piece of artwork, rather with photo, is that the other hand is actually behind the other arm completely. And I thought that’s kind of unusual. It’s totally obscured. And it doesn’t look like it should be like that, but it is. That’s how the photo is. And so we can get away with it. Now, my arm looks a little bit funky there. But you know what, I’m not going to worry about it. We’re just going to keep going. Just going to keep filling in here. I’m gonna, as I go through this, keep going over some sections as I notice that, hey, this part’s actually darker than it is compared to like the legs or something. The shadows up here are kind of the same as the shadows that are down here on the leg, but in some other areas, I’ve maybe made some spots a little bit too dark for what they are or not dark enough. And that’s fine. This is an iterative process. And we’re going to go through it just making changes as we go. That’s all we got to do. Something else, if you’re doing this traditionally, that you’ll probably have an easier time with is getting right up against the edges of your existing lines. If you’re doing it like that. Mine, because I have a digital brush here that’s kind of soft on the edge, it’s a little harder to do that. So I might go back and clean this up, but that’s something that’ll be nicer for you. Traditionally with pencil and paper, you have a lot more control. Truly, if you’re wanting to learn to draw paper and pencils, the way to go.
There’s some courses that’ll even have you do like pen and paper to help you build up the confidence of some of the lines you’re making. I’d recommend that as well, because the permanence can really help you with that confidence, frankly. Helps burn that in. Here’s something I wanted to show you. So I’m going to zoom in on this. And this is a mistake that you’ll make a lot when shading two surfaces that are close to each other, like something sitting on the floor or an arm that’s just starting to come out of the torso. And looking at the photo, we can see that the surface below is definitely darker. You can even see a little bit of light coming up on the bottom, like a rim light almost on the underside of the arm there. But what’s really easy to do when you’re thinking about these studies is you’re constantly thinking about, well, where’s this light coming from and how is it actually hitting the character? And so you’re thinking, well, okay, there’s a light over here, so shouldn’t that mean this surface here, this is the brighter one because it’s facing the light? It should be pretty bright, right? And this one’s facing away, it should be darker. And you’ll mix those up in your head, but usually the surface that’s below the other one is going to be the darker one usually. And that’s the case here. So that intuition you might get is wrong. And I say that without really specific evidence to back that up. That’s what I notice most often when I’m doing studies when I go and correct myself is that the surface on the bottom, that’s the one that’s going to be darker. And I’m going to emphasize that a little bit here and try to pull down this mark a little bit. Something else I could do is get the smudge brush out and play around with that a little bit. If you’re doing this traditionally, a blending stump for charcoal or even your finger is a good analog for this. It’s really fun to do, but sometimes it does look a little bit messy. So I’m going to avoid doing that for the sake of this video at least. But we’ll get back to where we were and I’m going to go back to painting. So once again, starting work on a fresh space here, we’re taking care of this elbow. There’s going to be some spots where maybe I’ll erase it to add some highlights in or maybe we’ll actually like switch colors and put something in there. Because my background color here, unless I mess this up, let’s actually check. Yeah, my background color is not white. So what I’m going to do here is I’m going to go ahead and just put in a little swatch for myself of the current color I’m using. And then I’m actually going to go pick white and put it over here. Now actually that looks a bit bright against this background. So I’m going to pick my background color again and just push it a little bit closer to white. There we go. That’ll be my nice highlight color. That’s what I want to use here when we go in and actually add highlights up here and whatnot. But we’re not going to do that just yet. So I’ll keep these here and I’m going to use this to get my color back. Again, if you’re doing this with pencil and paper, this is just kind of your choice of pencil. There’s white charcoal. That’s a fun one to use if you’re doing this sort of thing. Quite messy. And I actually think I overshaded that rod that he’s holding, but that’s okay. We’ll clean that up in a bit. I’m going to avoid using undo and there’s definitely some light marks that we’ll want to fix up in this area around the arm. But for now, that’s pretty good. I’m trying to pay attention to some of the bumps and stuff here.
So here’s another good thing to look at right at the edge of the deltoid. Hey, I know that muscle. So the shoulder coming up over here, that’s that’s the shape here. And there’s a shadow because of that. But that shadow is not just a line like that. That doesn’t look right, right? You’ll end up doing this a lot when you’re doing shading with anatomy, where it’ll be like, okay, this is that. Is it? Wait, that? No, it’s neither of those with something like this. You got to look really closely at the shape and see, okay, what, what is it? What’s that shadow? It’s kind of a triangle. And I didn’t necessarily necessarily put that in the right place. It’s kind of like too centered for where it is. So let’s get that out of there. I’m actually going to erase this back gesture mark I had in there as well. And let’s see. So it kind of is underneath the chin. It almost looks like it’s a part of his chin like that. But anyway, let’s just this mark right here kind of continuing off the shape that’s coming down there. So I just gently brush that in. I’m going to zoom back out. So I get the full picture things and say, yeah, yeah, it’s okay to start with. Like some things still feels a little weird about it, but we’ll get to it as we clean it up. And sometimes what feels weird is just the fact that I haven’t shaded the rest of it yet. It’s like some of that darkness kind of spreads out a little bit here, some of it, but not a lot. Pressing that stuff in. And let’s see. So we’re actually coming to the point where I’ve kind of done the first pass of shading on all this almost all this. And I haven’t paused it all, but I’m gonna pause now because my laundry needs to be changed. So I will be right back.
I did it! I did the laundry!
And we’re back. So let’s actually just keep going here. Well, actually, I realized I haven’t done anything with the face. I’m not going to detail the face too much because that’s not the focus of this, but I am going to add bits of shadow where the shadow belongs a little bit under a nose there. And we can kind of give some little marks for where the eyes kind of sit. Maybe looks a little goofy, but yeah, you know, there we go. Something like that. And I can actually see that on the reference, the shadows actually start to come up towards those eye sockets. So I’m going to bring that in too.
All right, so there’s a good bit of that. Let’s see. Let’s go through and see where I’m missing stuff. And then we’ll start to kind of remove some bits of shadow where I have done it too much. And then we’ll refine and well, keep going from there. It looks darker down on this side. Let’s add some there. It’s a bit of shadow here. I think it’s casted from the other arm primarily, but you can kind of see it in the shape of the muscle that’s there as well. The bicep. Look at that. I know another name of a muscle. How about that? See, you don’t need to know perfect anatomy to do art. You just need to know what things generally look like. And I’m still not at a point where I think I know what everything looks like. Like there’s still a lot I’m discovering, a lot I’m practicing.
Legs still continue to elude me. When I was drawing this on here, I was doing that several times. The legs make sure the proportions right because it was all sorts of goofy. We should actually kept some of my earlier revisions of these. I just kind of tossed them out because I wanted to get started on this video. But maybe next time I will remember to keep them. You can see how everyone’s got their goofy warm ups. That’s why it’s important to warm up. Maybe through the mic you can hear the neighbor’s dog. It is a good dog, I’m sure, but it has a rather unfortunate bark that I’m sure the other dogs make fun of.
Yeah, I have overshaded this leg a bit here because there’s not really anything dark there. Not as much as I’ve put on there at least. Let’s do a little bit here on the torso. There’s a little nub that lines up with this one. I’ll try to correct that in a little bit. We don’t have to be perfect, we just have to be more or less believable. Get that shaded in. Actually the lower side of this is pretty dark too and it actually gets fairly dark here. Almost where that line is. Where those intersect because they really overlap there and obscure out the light. That’s your ambient occlusion but also a lot of direct shadow.
But like Anatomy you also don’t need to know what the names of shadows are. It’s helpful when you’re learning the concepts but as you’re painting you can recognize where a shadow is and kind of how it forms and why it’s there and understand that instead. You’ll start to internalize those things and then you’ll make them a part of your own drawings automatically. It’s nice. Now this shadow here isn’t really wide enough. I’m gonna pull it down a little bit carefully brushing in. Still kind of gone just a little bit too harsh on some of these shadows.
We’re almost to the point where we’re gonna go in and clean that up a tad. Don’t worry. It kind of gets dark at the bend of the ankle there as well. Something else I’d like to actually take care of is the shadows that are below this character on the floor. This character, actor, poser, artist, person. They’re a person. You kind of see because there’s probably multiple stage lights on this guy that the shadows kind of bend out towards the end in multiple pieces.
I’m just gonna hint at that with some roughness here but I’m not gonna try to pay too much attention to it. It’s just a study. Doesn’t have to be perfect. I’m not gonna bother drawing the round disc thing they’re standing on. Wonder if it spins around but we’ll get the rest of it. By the way, Grafit Studio basically produces all these photos that I use for my gesture war ops and that you’re seeing here. A fantastic resource for art. I believe they’ve worked on things like League of Legends. I’ll double check that in the edit.
Yep.
And a lot of great models posing for the purpose of art. Like if you want to actually just draw a character in that pose you can get their reference packs and do it. And they’re great for learning to draw. I feel like my arm is really big in comparison to that. This guy if I were to take the arm away he’d have a really long neck and would look pretty funny. We’ll just let it be for now. It’s fine. Don’t worry about it. All right something like that. That’s feeling good. What I’m gonna do here is a horizontal flip. Probably should have been doing that throughout this. Let’s see does it look weird? Actually not too bad. Again there’s still some spots where we need to clean up the shading. Still aware of that. We’ll do it. Well let’s actually go ahead and do that right now. Finally. So we’ll just go in here and brush away some spots where I’ve just gone a little bit too dark. Because if I make them evenly shaded then everything just looks like a round tube. And that’s not right. Things aren’t round tubes. And these are lighter towards the right side. Because that’s again where the light’s kind of coming from and because that’s sort of how this particular limb is bending. But as it gets down here it kind of starts to hit that uniform darkness right. And there’s even a little bit more of a shadow right in the middle. Kind of just drew that as a line instead of shaded. There we go.
Maybe I’ll actually fade that out just a bit more. Nah. Not gonna worry about it too much. And you gotta pick your battles. The goal of this is to learn. If we learn then we’re successful. And I’m definitely learning as we’re doing this. Like truly even though I sound like I know what I’m talking about for a lot of this. Some of it. Like that’s true. But a lot of it I’m like hmm look at that. That’s interesting. The way that muscle looks. Let’s capture that and I will babble about it as we go. And that’s what we’re doing right now. Doing it live.
Trying to get that in there. Alright so I’m trying to thin out the mark for that leg muscle there. Think I’ve just about got it. That’s good. Also there’s like kind of a mark that comes up that way. We might actually use the white brush when we get to that just because it looks like it’s actually lit by the rim. The rim lighting. That back light.
Alright. Where else? We’re looking at the arms. Yeah the arms also look like I don’t know tubes. We don’t want that. The arms have more shadow towards the right side here. So I’m gonna respect that. Lighten that up a bit here. And also lighten this bit up because that is not as dark as I had made it. Once again, you know, grab your race if you’re doing this traditionally. I really like doing this traditionally. Let your hands get messy. It’s great. You can also use a blending stump or your finger to just smudge things around if you want to push the colors a little bit. It’s very fun to do. Now let’s see. What have I made a bit too dark in relation to others? Probably just erased a little bit too much there, but that’s okay. We’ll come back to it. Just keep repeating things back and forth. And something else that you don’t really see on screen here is that I’m constantly looking at this reference even though I’ve done this one a couple times now today. Just to make sure that I’m actually like capturing this accurately because our brains love to lie about stuff like this. They are not the most trustworthy visual representatives. And as you see right there, I actually just tried to shade something in a little bit too much because I’m thinking in my head, okay, it goes more dark, right? No, it doesn’t. It just it’s just right there. And this is the first thing I’m gonna do. And this actually kind of comes out over a bit and it thins out right over here as we start to get to the knees. Knees are another kind of hard thing to draw, but if you can get them in with some nice, tasteful shading marks at the right spot, you can make it look believable. That kind of gets it. We also have this mark right here that also brings that to life a little bit. Again, not going for perfection, just going for something that looks nice.
And yeah, there we go. That’s looking pretty good, I think. What else are we missing here? So not really shading up here. Let’s pull that back. Also, I’m gonna get rid of this line that I left in here. That’s another part of my gesture line. Let’s get rid of that. Let’s see if there’s anything I really want to mark with that. There’s a little bit of a shadow in here, just a really faint one. I think I actually put in a little too much. Bring that back a little bit. Don’t be afraid to be bold with your shadows, but do recognize when you’ve done just a little bit too much. And also recognize that you’re not going to get it right the first try or the second or the third. It takes a lot of practice. I’m certainly not getting this right. There are artists way, way more skilled than me at this, but this is where I’m at. This is where I’m practicing. This is where I want to share with you.
And I hope if this inspires you to do something similar that you’ll share with folks too, maybe on YouTube, maybe just with your friends. If you want to share it with me, you’re welcome too. I can’t promise private critique because I don’t feel like I am skilled at this. I don’t want to lead people down the wrong path. And honestly, I frankly have a lot of things going on and it’s hard to make time for that kind of thing.
Anyway, let’s lighten that up a little bit. Let’s see, lighten these a little bit more just because they’re not as prominent in the photo. You look at the model here and they’re not as dark as I just had them. I’m going to bring this around a little bit more because it’s kind of like a triangle shape that comes out to some extent. It does get darker in the middle here and that’s going to be harder to capture. I don’t know how much I’m really going to go with that because we can show this in the rest of the picture through some of our highlights and your brain will kind of infer the rest and and fill in all of the highlights. So I’m going to show you how to do that.
Let’s go ahead and switch over to this lighter tone here because I want to do a little bit of scribbling. So I’m going to give this a little bit of a scribble, but I’m going to give it a little bit of a scribble. And I’m going to give this a little bit of a scribble. So I’m going to give this a little bit of a scribble. And I’m going to go ahead and switch over to this lighter tone here because I want to do a little bit of scribbling on there and you can kind of see that it’s lighter than the background, which is what I want. It’s nice to have paper that is tan colored for this reason. A lot of newsprint, like the cheapest paper really, almost has that sort of tint to it so it’s a freebie. It’s perfect. You can use white charcoal on it or like white colored pencils.
That’ll do it too. Just a lot, a lot nicer, messier though. That’s part of the fun.
Put some of these marks in and I’m probably going to go a little too heavy on them. So I’m going to take this down a little bit, about half opacity. Now, you know, there’s no direct analog for opacity and traditional, but you know, press lighter. We have these tools digitally because it’s harder for the electronics to really accurately approximate a pencil, even with the amount of like levels of pressure that things will advertise. It’s still like way easier with a traditional pencil than it is with a fancy stylus.
Also like, you can wear down a pencil a little bit and your muscles will start to adapt as you’re drawing, but like you don’t get that sort of feeling when you’re drawing digitally, you just have your stylus that sort of wears down but tries to still act the same way. It doesn’t really, really compare the same. So you definitely get an easier time traditionally. But anyway, in digitally, we work with some other tools to kind of approximate that and give us a little more leeway.
But that’s not entirely what’s going on here. I just want to keep myself from going a little too crazy with this one. So I’m not trying to light up areas like this, for example, because that’s lit just by the main light. I’m trying to use this brush, this color specifically for things that are lit by what looks like that other light off to the side. There’s just just a little bit of that. And that gives it just the subtlest of variation here. I think the white color I’ve got, well, it’s no, it’s still roughly the same hue, but it still looks cooler, right? Because the color temperature of an orange is warmer, cooler, whatever. I always forget how color temperatures work. Something, something light bulbs. Let’s see, there’s a little bit down on the feet here, kind of illuminates from that direction. We could even make some up a little bit as long as it’s believable. Now, granted, if you’re going to do a study, try to do the study part first, but if you’re towards the end of it and you’re like, all right, let’s have some fun with it, then go for it. Make some stuff up. It’s all good. If you do something cool, share it. It’s awesome. Yeah, there we go. Awesome, awesome, awesome. I’ll get a little bit more on these arms here because these actually do get illuminated quite a bit. Like whatever light is going on back there, I’ll get those in there. I’m not doing this on a new layer or anything. Like I’ve got a backup layer in case I need to rerecord this, but it’s all just on one. So just like a traditional work.
And I’m going to switch back to this, kind of just blend that in just a little bit. I think it went a little bit much on that one. And I’m going to push this in a little bit, just kind of up there. There we go. Let’s go in and do just a little bit more detailing on some of these edges so they don’t have these like weird sort of light marks where they should actually be darker. Again, I’m only going to do this on edges that really actually get darker than the others because otherwise, well, otherwise I’m doing it wrong. Unless that’s the artistic effect I want to have, like a light border before you do get to the darker line work, which actually is a really cool effect. I do that sometimes in my art. I might actually do that more often. It’s really fun. But for this study, my intent is to try to capture what I see. So here’s, oh, here’s something I actually want to change.
So I’m going to zoom in on this. Looking at that muscle, it does not like stay bright on this little triangle here. In fact, I might even erase a little bit of that line. This might look a little weird. We’ll see, fade it out a little bit. Oh gosh, yeah, that makes the leg a bit funky. But hey, let’s fill it in. Something like that. But even then, like it’s lighter than the rest. So we’ve got that shape there. There we go. That’s, that’s kind of what I want. Yeah. All right. A few more spots here left to clean up. It’s a cleanup.
And then I think we’ll call it, or maybe do a little bit of a fun thing with it at the end. We’ll see here. Sometimes when I’m doing my gesture studies, I’m like, well, what if I made it into a creature? Maybe we’ll do that here. Fun little silly bonus add on. Why not?
And for the contingent of you that like to put this on in the background and just listen to my voice, you’re, you’re welcome. I guess I still find that a little bit odd. I didn’t think I had that much of a, I don’t know, radio voice or something, but I guess I’ve practiced it a good bit through these videos. Although certainly right now it’s a little bit less charismatic than my usual, because I’m drawing. Chances are I’m going to have to redub a lot of this audio, because I don’t think it’s actually clearly coming through the mic and I want to put a little bit more character into it. And I am, I’m actually redubbing it right now. But hopefully over time, as I do these, I get a little bit better at that. And I don’t need to go through and re edit. Because this is nice here. Just standing drawing. I’m getting my practice in, you’re getting to see some stuff. Hopefully you’re learning a little bit or hopefully you’re at least getting entertained.
Or hopefully you’re seeing something and going, Oh my gosh, look at how crazy wrong he did that one. And I’m going to be like, well, gosh, yep, you’re right. I might even look back at this in a few months and be like, Oh gosh, why did I do that? That’s so messy. But you know what, it’s fine. Doesn’t matter. Pull it over a little bit. It’s almost like a darker line near the underwear. I did kind of avoid bothering doing anything with the underwear because like, it’s just not a useful study for what I want to do right now. It exists. It’s there. It makes it safe for YouTube.
That might’ve been a bit much on that. Something like that. Let’s do a flip check again. Yeah, looking good. Kind of fixed up the lines that I, you know, scratched up there. Give that a little more definition. Now granted, if I had done my lines on a separate layer, we’d probably be able to turn them off and you’d be able to see more or less the proper silhouette of the character. That’s always a cool thing, but I wanted to make sure I did this on one layer. So focus on traditional. Don’t feel left out here. Also, it’s kind of fun. It’s a nice challenge.
And you shouldn’t feel left out doing traditional. I think that’s the, that’s the coolest way to do art. You do traditional. There’s no, there’s no people thinking you did AI, no temptations for those of you who have tinkered with that. Although I think every artist has played with an AI bot to see what it does do, right? You got to understand it, see what it is so you know that you don’t like that kind of thing. And I have as well, I tinker with it. Made me feel gross. I’m like, well, that doesn’t help me learn to draw. I don’t want that. So I’m doing this.
This is the cool thing for me is the learning, having an AI do it for me doesn’t help me learn. That’s, that’s nothing. Now, like there’s almost like a bit of a burst pattern coming off the shoulder here. Let me see if I can capture that.
Something like that may have shaded a little bit too hard, but yeah. Let’s do a gentle blend on that one. There we go. Soften it a little bit. There, look at that. And yeah, for funsies, let’s try something. Let’s pop open a new layer here. Why not? What are we going to do with this? Let’s see. Let’s make a little creature. So I’ll do this. You have the spikes.
Now I’m not really using any reference here, just kind of doodling. So you know, it’s a little bit messy. That’s fine. And because I’m refusing to zoom for this video, it’s got a lot of hairline marks on my lines. It’s hard to draw this small on a tablet. But you know what? That’s okay. It’s fun. It’s lively. I’m gonna go back here and just maybe do this one again though. So it looks a little nicer. Got that. All right. Cool, cool, cool.
Oh my gosh. Traditional friends, I’m jealous of you right now. All these weird line wobbles that truly do not happen on paper. Because I have a layer here, I can actually erase this bit of tail here without affecting the rest of it at least.
Look at that. Look at that. You know, we’ll give him some ears. That and that and there we go. Fun little snoot. Look at that. And I can give him a face. Looks so happy about to hit someone with a pole. Oh, look at that. There’s some fluff. Why not? Oh my gosh, this is messy. Messy, messy, messy. Once again, not zooming. You should be zooming and rotating your canvas if you can, because that’s just that. That’s way easier. I’m doing hard mode here. You’re also probably like, I’m not gonna bother doing this here, but you probably do something different with the legs if you wanted more of a creature look. A bigger foot there. Digitigrade legs coming out the back. Do something with that. Yada yada yada. Maybe you do that here too. I don’t know.
I’d have to think about this one a bit more before I really went and messed with it, but sometimes when I go into it mindlessly something neat comes out. I don’t know about this one though, but it was fun to do it in any case. But for the sake of this, that’s where we’re going to leave it at.
Now that it’s been a few hours, for me, I can see some spots where I’d have done things differently. That back arm is too funky, and the shading on the chest could have used more touch-up. But the point wasn’t to get this perfect, it was to study, and to learn, and to share some of that with you. Hope you enjoyed it! If you’ve not tried this kind of study before, give to a go – and if you have, go brush up, it never hurts. Have fun with it artist, go chase that passion.
| Production Info | |
|---|---|
| Music | Delayde, anybodyy - Where The Sun Goes; Delayde - Southwesterly; Hanz - Rolling Eyes; Sleepy Fish - I Main Samus Now; Sleepy Fish - Fireworks Festival; Blue Wednesday - Mother Nature; The Field Tapes, Middle School - Lilo; Aarigod - Ocean In A Shell; Ian Ewing - Garden to Sky; Arbour - Solarium; Middle School - Same Old Circles |
| VRChat World | Sea Breeze by WispyWoo |
| VRChat Avatar | Vulper by Royalty, Meaty, and Reval |